

With kids ages 12 (sassy, bored, texting, know-it-all preteen), 8 (all boy, all the time), and 5 (the baby who is always left out of every activity cause she's "too little"). I have no patience to take them anywhere, we have no money after this month, I have little patience to bake, play, craft with them. On the other hand, I don't want them zoned in front of the TV all day, either.
*sigh* it's gonna be a long 10 days at home.
What are you doing with your kids to keep them busy?
Subscribe To
Monday, December 26, 2011
Sunday, December 25, 2011
Christmas Eve Run!
I run. I run and run and run, all.the.time, it seems, but then I got hurt, and took a month off from running. Now I run for a little while and stop, then my knee hurts I cry and whine, then I run again, and cry and whine about my endurance. It's a vicious circle. I can't run far cause my knee hurts, and I can't build my endurance cause I can't run far.
I'm slowly getting back to decent distance. I consider 4 miles a decent distance to run a few times a week along with one long run of 8-10 miles a week. I won't be seeing the 8-10 for a few more months, but I'm building back up to the point of my 4 miler with little to no pain.
I should say, this is NO.RUNNING.BLOG. I hate to run...but, alas, I can't stop. If you want a running blog I have several friends that have some GREAT running blogs TOO TALL FRITZ (Amanda is funny and fun), Maggie RUN FOR PI(e), Kelly and KELLOMETERS <-- very clever, Kelly, and my recent new pal, Amanda at GET TO GOAL. My awesome running group the F'N runners ran a Christmas Eve run from 3.5-7 miles. I ran 3.5 with my 12 year old, Megan and my pal Lisa. Daily Vitamin F says if I run at least 5k (which is 3.1 miles) and put my picture out there, I can win a prize. (I.LOVE.PRIZES). So here's my picture:
This is actually me and my gorgeous daughter Megan (she's the beautiful on on the right).

This is the F'N running group at the trail on Christmas Eve!

And here I am with my "official" bib

Cheers and Merry Christmas!
Thursday, December 22, 2011
Painted scarves?
I dyed these scarves the other day, and decided to put my skills to the test. Check out these scarves! I've already got a custom order for one, which is kinda cool. The yellow one was my test scarf, since it had a few blobs of green dye on it.


Tuesday, December 20, 2011
Eat Cleaner Product Reveiw
This will be my first product review on this blog, so I thought I would put my mom hat...erm..apron on and tell you about a product that is a staple in my kitchen. EAT CLEANER PRODUCE SPRAY. I've been using eat cleaner for almost a year. I always keep fresh fruit on hand for the kids, it's so much easier to grab an apple than to try to weasel a crap-food snack outta your mom. I don't let the kids eat sugary snacks. Truth be told, they have two days a week (Friday and Saturday) when they can have "a treat" i.e. ice cream, chocolate, etc. Sunday-Thursday it's fruit, yogurt or a cheese stick.
I was introduced to eat cleaner by Chalene Johnson, a life coach and mentor to me. She did a webinar, and featured Mareya (the genius behind the product). Mareya's dad is a scientist who helped her create this product. She's a single mom who wanted better for her family. Who can argue with that?
Pros:
- It's SAFE!
- It's cost effective
- It works
- It makes produce last longer
- It comes in produces and SEAFOOD wash!
- I spray it on Rory's peeled and cut apples so they don't brown (she won't eat the skin and has to have a healthy snack for school).
- It comes in wipes to send to school
- I don't know about your schools, but ours gives kids fruit unwashed with the product sticker still on it. How many kids do you think wash that fruit? I pack the wipes in their lunchbox, they can wipe the fruit off before they eat.
- The product removes wax and pesticides from fruit and veggies, you can actually SEE the difference.
Cons:
- I can't buy eat cleaner at a local store, I have to order it
I love this product for so many reasons. A single mom created it-this makes me trust the product that much more.
If you would like to order eat cleaner you can visit Mareya's website at www.eatcleaner.com I just received a discount code for ordering online: spark25eatcleaner

Monday, December 19, 2011
Really? Christmas?
As I was lighting the grill outside for dinner, this evening, I realized how odd it is to grill in December. I live about 35 miles South West of Chicago; this time of year it's usually in the low 30's. Today it was 54°. This weather has left me a bit underwhelmed this season. The kids get off the bus and ride their bikes for an hour until it's too dark. Shouldn't it be too cold for that? Shouldn't we be looking forward to cozy time in front of the fireplace and snuggling to watch the classics? What's going on?
I live over 300 miles from my dad's side of the family, and over 1200 miles from my mom. I moved up here out of college looking for a good job, that wasn't a farmer's wife or teacher. In Southern Illinois that's your fate, unless you're savvy enough to have a successful business. The men are iron workers, farmers or coal miners and the women stay home or teach (very generally speaking). My husband's family is the only family I have close, and this year will be my in-law's last year here. They are retiring to Florida. My kids are going to remember their last Christmas at Grandma's house as balmy. There will be no ice skating on the pond, no pulling the sled around on the four-wheelers, no snowmen or snow angels. It's just...lame.
I need a good snowfall, damn it! I need some sub-zero temperatures and foggy windows from warm baking inside and cold air outside. I'm opening the windows instead to cool off the house. I bought a ski mask this week for my cold-weather runs...hhhmpfff! I hope we get a few flakes before the end of 2011.
Cheers and happy baking!
Jeni
Thursday, December 15, 2011
Loaded Baked Potato Baked Mac & Cheese

preheat oven to 375°
I just kinda made this up to spruce up a baked mac and cheese recipe so all ingredients are appoximate.
you'll need:
3/4 lbs of cooked bacon
cooked macaroni
for the sauce:
4tbsp of butter
a little salt and pepper
4 tbsp of flour
8oz cream cheese
2 cups of milk
3 cups of shredded cheddar divided
melt butter and cream and whisk together, add flour salt and pepper slowly whisking the whole time, add milk and whisk for around 10 minutes
add the cheese and whisk until melted, then add the bacon and mix with the cooked macaroni and bake for 30 minutes, covered. take out sprinkle the rest of your cheese (should be around 1 cup) leave lid off and cook another 10-15 minutes until its golden brown (less time if you don't like the cheese crispy).
holy shit.
Sugar Scrub Gifts!

Sugar Scrubs are such a nice treat for your body! They exfoliate your skin and make you feel soft and touchable. What a great gift to give at a FRACTION of the cost! How does $1.14 a 1/2 pint jar sound (compared to $8 - $38 for store bought brands).
Here's what you'll need for ONE jar:
- 1- 1/2 pint jelly jar
- 10 starkist mints
- 1/3-3/8 cup of baby oil
- 1/2 cup sugar
- Food processor or mallet (to finely crush mints)

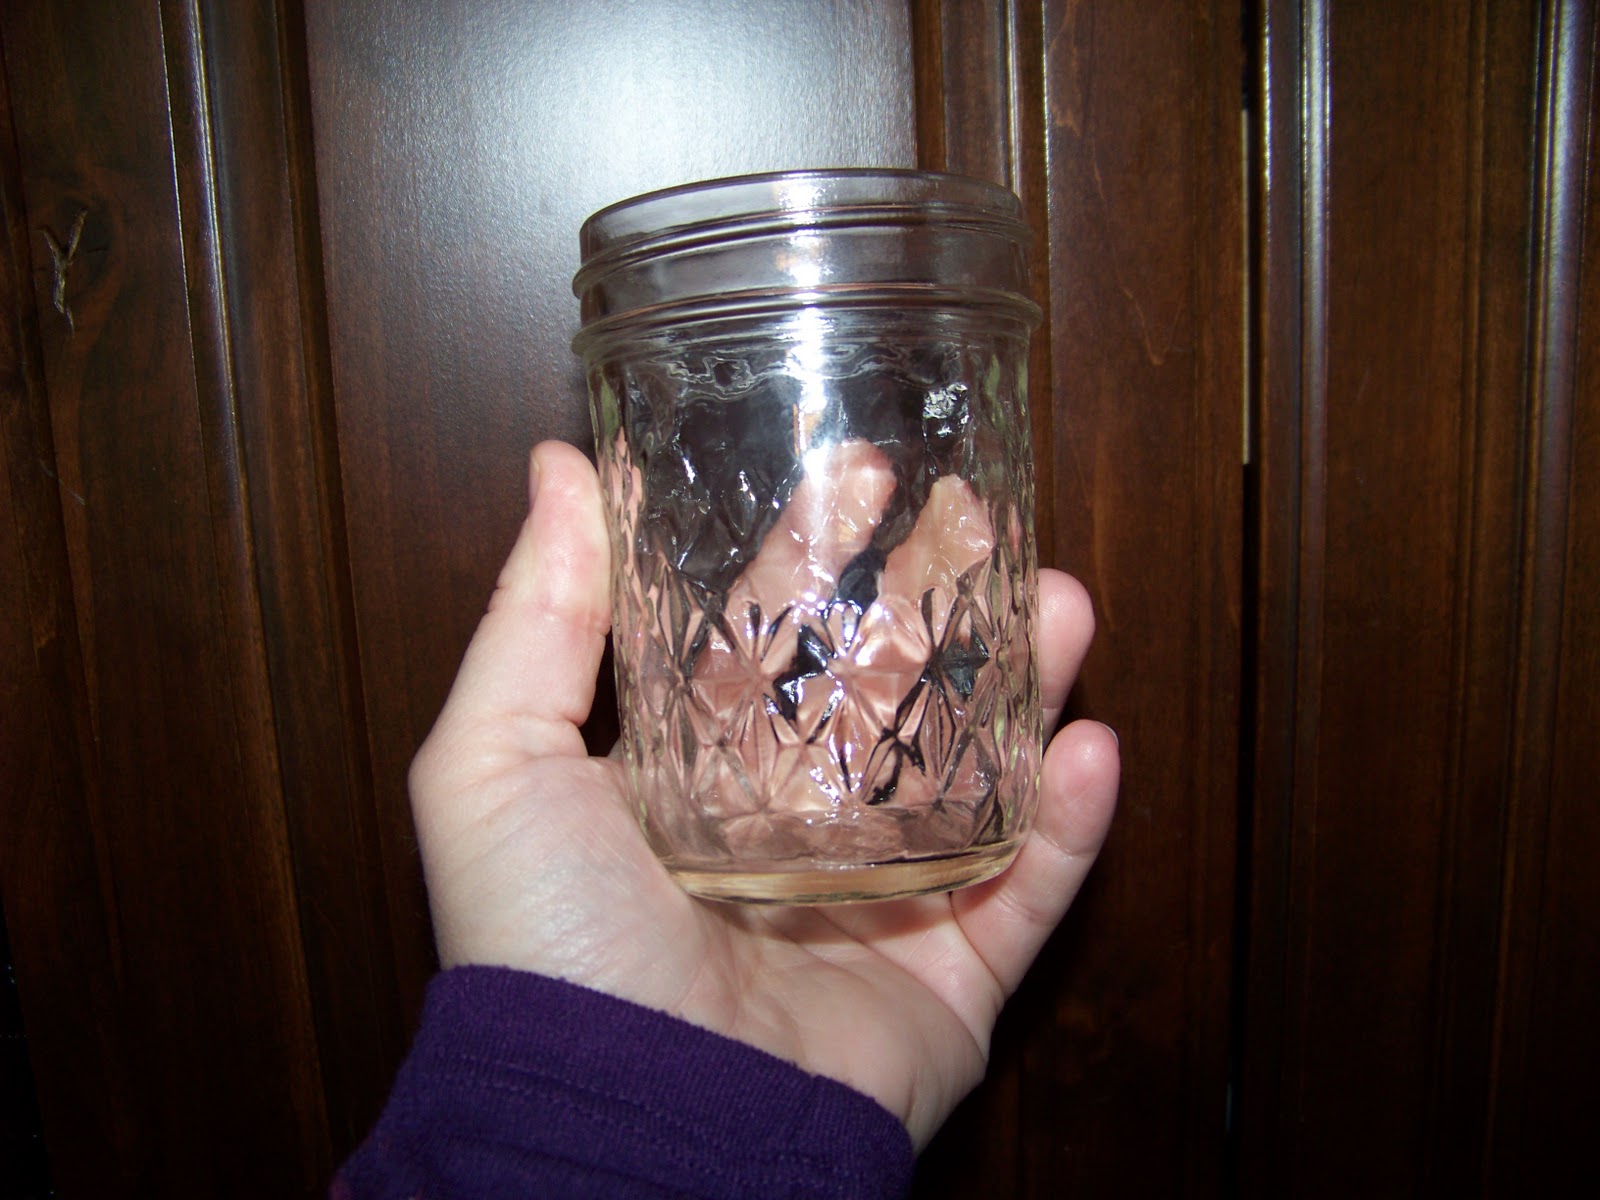


With your food processor (or mallet-depending on your frustration level at the moment) finely crush your mints.

I've tried this a few different ways, and found the easiest, in my opinion. Put either your sugar OR your mints in first, then the baby oil, then your last ingredient.


put the lids on and shake it up! Add a ribbon or piece of fancy fabric to the top (between the lid and the ring) and you've got the easiest spa gift on the planet!!

Pair it with your favorite EASY PEASY HANGING HAND TOWEL as a over achiever gift!
Wednesday, December 14, 2011
Easy Peasy Hanging Hand Towel

If you are looking for a super easy sewing project for a beginner or something fun and quick, this is your project! Here's what you'll need:
- 1/4 yard of fabric
- scissors
- kitchen towel
- needle and thread or sewing machine
- button
- pattern
I found this project on Pinterest, HERE at the Creamer Chronicles Blog Spot, that is also were I found this pattern. I used foam board to cut out the pattern.

Place the patter on two separate pieces of fabric. I used complimenting fabrics, but have also used the same for back and front. Remember to lay the fabric on top of each other with the two right sides together.

Cut out the pattern onto the fabric.

Sew the two pieces together inside out. Remember not to sew the bottom, as this is where you'll be putting your towel.


Turn your fabric right-side out and top stitch. I used a fun whimsical stitch that is programmed into my sewing machine.


Grab your kitchen towel and cut in half width wise.


Gather your towel. Creamer Chronicles suggests basting this part, but I don't.

Fold the opening in, (where you're going to insert the towel), so there are no raw edges showing.
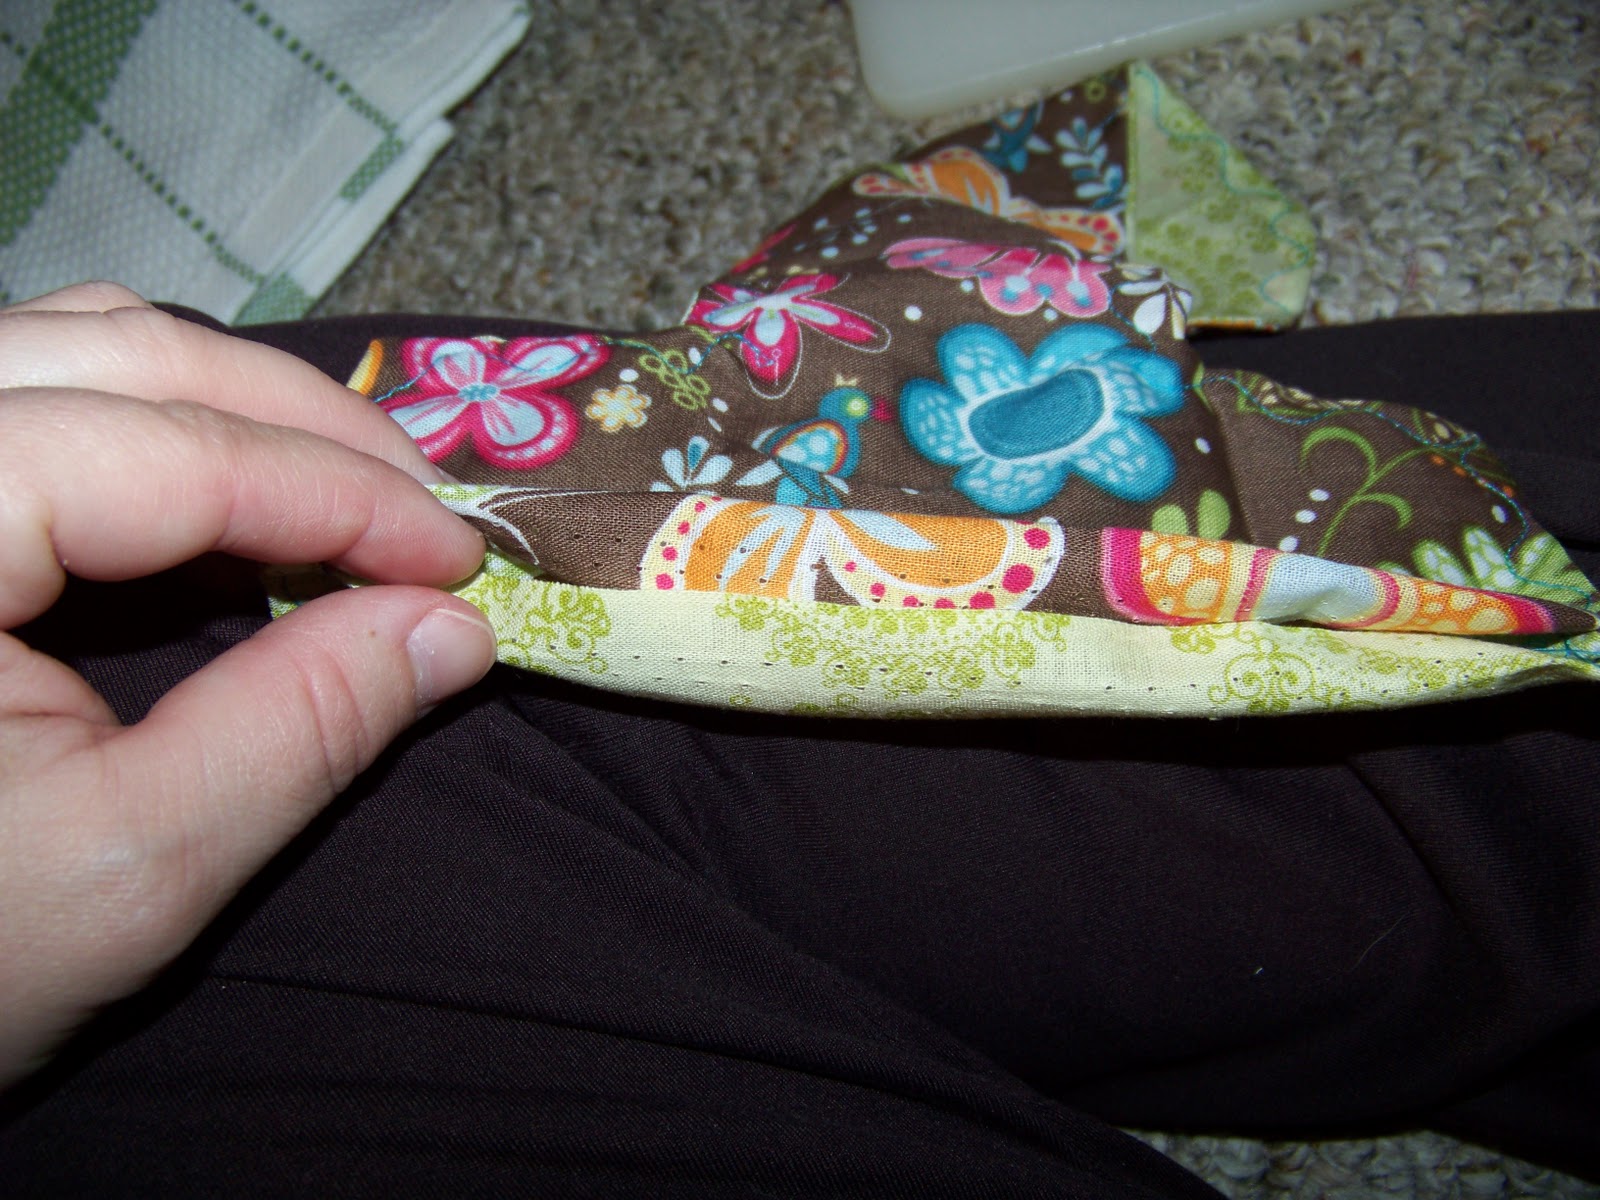
Take your gathered towel and insert the raw edge into your fabric piece. spread it out evenly to have a nice, pleated look.

Sew these two pieces together, I used that same curvy whimsical stitch, it's a bit more forgiving.


Once your hanging towel is put together you can sew a button hole into the top of the fabric.


Pick a button you like and sew it on to the bottom of your fabric piece. If you are using complementing pieces of fabric, you can sew two buttons on to the fabric on either side to make it reversible. (TIP: use a pin in between the buttons, while you sew, so you can have enough room to button it.)

And there ya have it! One cute hanging towel to use or give as a gift! These are so nice to have in the kitchen or garage.


Tuesday, December 13, 2011
Design Your Own

I used to have a screen printer, it scared the crap outta me. I sold it on craigslist with a shit ton of accessories for an ungodly low price. Now I just paint on my clothes with quality textile paint, they're one of a kind, they usually turn out pretty cool, and I love them. The downside, of course, is the bumpy uneven surface of the shirt, not the smooth surface of a screen printer.
Most of the time I'll just freehand my design on a piece of paper with marker (I like the way marker writes, it's fat and smooth, unlike a super sharp pen). But you can just as easily print out something you like and use these instructions accordingly. This post is a little tutorial on painting an owl (or whatever floats your boat) on a knit t-shirt.
If you've read my layered shirt blog post, you know my love for knit fabric (I farking hate it), painting on knit is much easier than cutting and sewing it though. Here's what you'll need:
- T-shirt or what ever you want to paint on.
- A design
- Exacto knife
- Cutting board
- Marker-washable marker if you don't want an outline/permanent if you do.
- Paint brushes
- Fabric paint (I use Jacquard Textile Paint It's quality paint with out paying an arm and a leg)
If you can, wash and dry your shirt, don't use fabric softener or dryer sheets. If you can't wash and dry your shirt, that's okay too.
Place your image on the cutting board and use your exacto knife to knock out the parts of the image you DO NOT want on your piece.


Place the paper on your shirt and trace the image knockout on your shirt with mark
Paint the image the way you want it.
Place your image on the cutting board and use your exacto knife to knock out the parts of the image you DO NOT want on your piece.


Place the paper on your shirt and trace the image knockout on your shirt with mark
Paint the image the way you want it.


Let the paint dry and follow the directions on the paint bottle for "setting" the image (for Jacquard you'll heat set, using and iron)
Subscribe to:
Posts (Atom)